Photoshop Elements Tutorials > Stitch together a panorama
|
Stitch together a panorama
Have you ever taken a series of photos and tried to piece them together to form a panoramic image? Well, put away the tape and glue. Adobe

1. Set up the Photomerge composition.
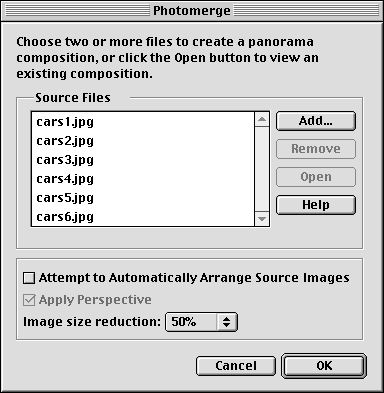
Choose File > Photomerge. Then click Add and navigate to the "cars_pano" folder in the Tutorials folder located inside the Adobe Photoshop Elements application folder. Open the "cars_pano" folder and select all the image files. Click Open to add the images to the Source Files list in the Photomerge dialog box.
Specify 50% for the Image Size Reduction at which to import the "cars_pano" source files. The reduction in size of the imported images affects the size of your final Photomerge composition. Make sure to deselect Attempt to Automatically Arrange Source Files. You'll assemble the source images manually in this Web tip. Click OK.

2. Arrange the composition.
Photomerge opens and reduces each image in "cars_pano." The Photomerge dialog box opens with the "cars_pano" images appearing in the lightbox area.
Select the select image tool and drag the images to the work area to arrange your composition. Notice how the images of the automobiles overlap. When you photograph images for your own Photomerge compositions, you'll want to make sure your images overlap by about 30%. Don't worry about fine-tuning the alignment of the images, you'll do that later.

3. View the composition.
As you add images to the work area, the composition will get too large to view in its entirety at 100%. To change your view of the composition, use the Navigator. Position the pointer in the red box in the Navigator thumbnail. Drag the red box over the area of the composition you wish to view. Use the zoom out or zoom in button, or drag the slider bar to adjust the magnification of your composition in the work area.

4. Adjust the perspective of the composition.
The perspective must be established for your photos to successfully merge together into a continuous image. Photomerge establishes the perspective when you place a vanishing point in your composition.
Select the Use Perspective option in the tool settings. Then select the set vanishing point tool and move the pointer over your composition in the work area. Click one of the images to manually assign a location for the vanishing point. Since your panorama is viewed from a frontal position, try locating your vanishing point at the center of your composition. A blue box appears around the image used to establish the perspective for your composition. The images not used for the perspective have a red bounding box when you click them.

5. Align the images.
If the images in your composition don't line up as you wish, you can align them using the select image tool and the rotate tool. You can also change the perspective of the entire composition. Since there can be only one vanishing point in a Photomerge composition, clicking a different image with the vanishing point tool moves the vanishing point and changes the perspective of your composition. Sometimes it's difficult set a new vanishing point or grab an image that's obscured by another overlapping image. Hold down Alt (Windows) or Option (Mac OS) as you move the mouse in the work area. The image, whose center is closest to the pointer, is highlighted. You can then click to select the image.
Be open to experimenting with the perspective of your composition. As you create more panoramas, you'll become more adept at choosing a location for the vanishing point.

6. Preview the composition.
Select Advanced Blending and click Preview. Advanced Blending balances the exposure differences between the source images. When working on your own compositions, you would select the Cylindrical Mapping option if you have a "bow tie" distortion in the overall shape of your composition. The results of applying both options are viewable when you preview your composition.
Once you're finished viewing the preview image, click Exit Preview to finish merging your composition.

7. Generate the panorama.
When you're satisfied with your composition, click OK in the Photomerge dialog box.
8. Put the final touches on your panorama.
Photomerge generates your panoramic image as a new editable Photoshop file. You can crop any irregular edges or unwanted portions of your composition. And you can also use any filter, painting tool, or editing tool to fine-tune your image.
In our automobile panorama, we used the burn and dodge tools, the sharpen filter, and the clone stamp tool to remove blemishes and enhance our composition.

Photoshop Elements Tutorials > Stitch together a panorama